Edit GIS Features - GIS
Users in NEXGEN have the ability to edit GIS layers
directly from the GIS module in NEXGEN. Before being able to edit GIS features,
GIS settings must be configured correctly by system administrators and GIS
users must enter the proper login information.
Log In to GIS from NEXGEN
To set up GIS feature editing services in NEXGEN, you must first enter your login credentials for GIS in NEXGEN. To do this, follow the steps below.

Note: You
must do this initial setup through a web browser. You cannot complete this
initial setup on our NEXGEN mobile applications.
- Navigate
to your user details page.
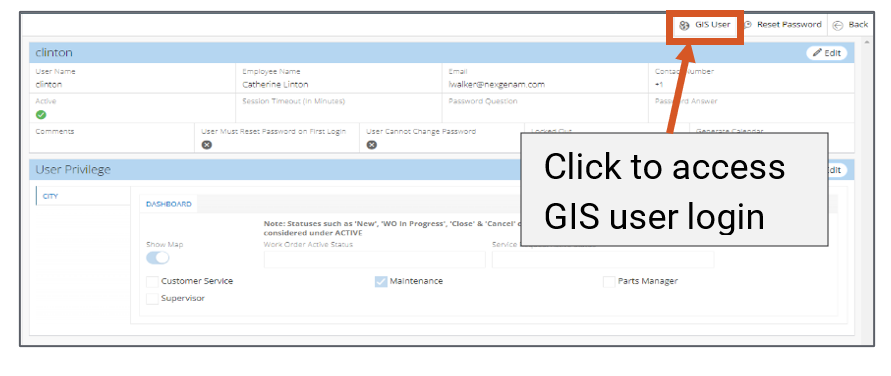
- Click
Settings >> User Details
- Click on GIS User on the top right.
- Select the layer you would like to edit from the dropdown.
- Enter your username and password.
- Select the proper checkboxes for permission.
- Add – Check to be able to add new features.
- Edit – Check to be able to edit existing features.
- Delete – Check to be able to delete existing features.
- Sync – Select to be able to sync layer information.
- **Please note that while users
can select all checkboxes in NEXGEN to add, edit, delete, and sync, permissions
must also be given through a client’s GIS hosting service. If permissions for
the GIS user account are not granted on the GIS provider service, users will not
be able to perform the add, edit, delete, sync options in NEXGEN.
- Click “Save” to save your preferences.
Edit an Existing Feature
To edit an existing feature on a GIS layer, follow the steps
below.
- Navigate to the GIS module.
- Hover
over Assets and click GIS
- Turn on the proper layers you would like to edit by checking the box next to the layer.
- Select the pencil edit icon from the GIS toolbar. (If the toolbar is not visible click the circle with the 3 lines)
- Select “Edit Feature” from the box that appears.
- Select a feature on the map to edit.
- Click
on the feature.
- Adjust information that appears in the edit box.
- Click “Update” to save your edits.
Add a New Feature
To add a new feature (asset) to an existing layer on a GIS
layer, follow the steps below.
- Navigate to the GIS module.
- Hover
over Assets and click GIS
- Turn on the proper layers you would like to edit by checking the box next to the layer.
- Select the pencil edit icon from the GIS toolbar. (If the toolbar is not visible click the circle with the 3 lines)
- Select “Add Feature” from the box that appears.
- Click on the map where you would like your new feature to be placed.
- Fill in the information for the fields that appear in the edit box.
- Click “Update” to save your new feature.
- A prompt will appear asking if you would like to create a new asset. Click to create a new asset from the feature placed on the map.
- You
will be taken to a blank asset record page.
- Enter
in asset information and click “Save” to save your asset in NEXGEN.
- Follow steps 1-8 to add additional assets.
Related Articles
GIS Overview - Web
NEXGEN's GIS module allows users to view their linear assets from within their maintenance management system. From the map, NEXGEN users can add new work orders for multiple assets, review asset information, and more. GIS Overview Video Accessing the ...Create a New Asset - Asset Inventory
In NEXGEN, an asset can be defined as any piece of physical property that requires maintenance. Assets are tracked and managed in the Asset Inventory module. Before adding assets to the NEXGEN system, users should determine their own criteria for ...Asset Replacement and Refurbishment - Asset Inventory
If an asset needs to be replaced and/or refurbished, you can follow the workflows below to document the process in NEXGEN. The processes involve a technician who performs the work needed and records asset details as well as an asset manager who ...Add or Edit GIS Assets
Add or delete GIS assets directly in the GIS module. Or, edit the placement or attributes for existing GIS assets. Note - you must have the correct user permissions and the GIS administrator must enable GIS attributes to be editable in order to use ...Store Asset Coordinates - Work Order
Assets can sometimes be large and span a long or wide area. If this is the case, users can determine precise asset coordinates and store them so that the asset's exact location can be referenced in the future. Note that this feature only applies to ...
Recent Articles
NEXGEN Admin Webinar Series (Part 7: Workflow Automation & User-Defined)
Video Guides: How to Use NAMI Dashboards
Accessing NAMI Dashboards Learn how to locate and access NAMI Dashboards within Work Orders, Service Requests, and Preventive Maintenance. Changing Tabs and Interactive Functionalities See how to navigate dashboard views, explore different metrics, ...June 2026 New Feature Webinar
Latest Phone Release - Version 2.0.5 (June 2026)
Phone Application Updates Asset Inventory Users can now type in an asset QR code in the search bar to find an asset in addition to scanning. (#23758) Form A quick action button to create a form will now be visible in the Hotspot. Users can tap to ...iPad Version 3.0.6 (April 2026)
iPad Updates Bug Fixes Resolved comments cutting off on mobile devices. (#24035) Fixed the issue of a Flag label unintentionally showing when completing assets. (#26071) Users should now be able to request items that are at zero quantity from the ...