Create a Parent or Child Problem Type - NEXGEN 311
You can configure problem types in your NEXGEN 311 site to allow for users to select different pre-set issues to report. These problems are organized in a hierarchy in NEXGEN; parent problems act as categories in which child problems live. This article goes over how to configure parent and child problems so users can click through the 311 Portal and report issues via an organized click path.
Navigate to NEXGEN 311 Settings
NEXGEN 311 can be configured in the back end of your NEXGEN site. To navigate to NEXGEN 311 problem type configuration:
- From the NEXGEN dashboard, click "Settings."
- Click "Integration."
- Click "311 Service."
- Click "Problems."
 Create a Parent Problem
Parent problems can be created and edited from the Problems section of your 311 settings. To create a new parent problem:
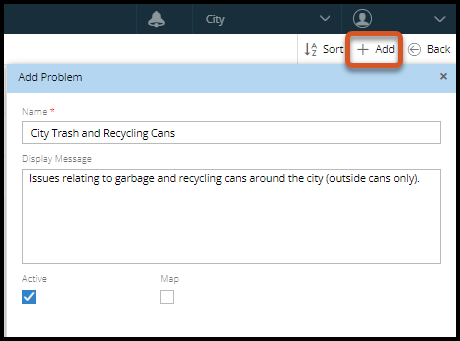
- Within the 311 Service settings and in the Problems section, click "+Add" in the top right.
- Enter the problem details.
- Enter a name for the problem.
- Enter a description. This will be visible under the problem name on your portal to help users decide which problem best describes their issue.
- Make sure Active is checked so the problem is shown on the portal.
- Check Map if you want users to be able to select the location of this problem from a map as opposed to a drop-down menu.
- Click "Ok" in the bottom right to save.
 Create a Child Problem
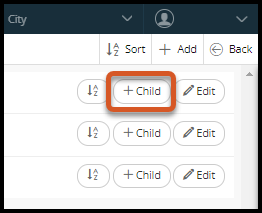
Child problems are housed within parent problems. To create a child problem:
- Within the 311 Service settings and in the Problems section, click "+Child" next to a parent problem.
- Note: If the level you want to add a child problem to does not have the "+Child" button visible, then you must first dissociate the action attributed to that level before you can create any child levels.
- Enter the child problem details.
- Add a name for the child problem. This will be visible to end users.
- Add a display message. This is information that will be visible under the child problem name and to end users. It can include information on what is contained within the child problem.
- Select the Active checkbox to make this problem visible in the portal.
- Select the Map checkbox if you would like the end user to be able to report the issue by dropping a pin on a map as opposed to selecting a location from a drop-down menu.
- Click "Save."
Related Articles
Configuration Guide - NEXGEN 311
Please see the document linked below for our NEXGEN 311 User Guide.Delete a Problem Level - NEXGEN 311
Problems in NEXGEN 311 are the types of issues users can report using the 311 Portal. These problems are organized into hierarchies, meaning they can be at either the parent level or the child level. If you no longer need a certain problem type in ...Custom Fields - NEXGEN 311
Custom fields can be created in the 311 Service settings and are used to gather more information from users when they are submitting a service request through the NEXGEN 311 Portal. See below for instructions on how to add custom fields to your 311 ...Add a Parent or Child Location - NEXGEN 311
If you would prefer for NEXGEN 311 Portal users to be able to select locations from a drop-down menu instead of dropping a pin on a map, you can create set Locations in the Locations section of the 311 Service settings. Much like Problems in the 311 ...Map External SR Types - NEXGEN 311
Service request types in the NEXGEN 311 Portal can be mapped to internal service request types on your NEXGEN site. This means that when a portal user submits a service request and it gets automatically sent to NEXGEN, the SR type will auto-populate ...
Recent Articles
Video Guide: How to Use NAMI Dashboards
Where to Access NAMI Changing Tabs and Interactive Functionalities <br> How to Filter, Drill Down, and View Underlying Data <br> Example Flow Using Blue and Green TabsJune 2026 New Feature Webinar
Latest Phone Release - Version 2.0.5 (June 2026)
Phone Application Updates Asset Inventory Users can now type in an asset QR code in the search bar to find an asset in addition to scanning. (#23758) Form A quick action button to create a form will now be visible in the Hotspot. Users can tap to ...iPad Version 3.0.6 (April 2026)
iPad Updates Bug Fixes Resolved comments cutting off on mobile devices. (#24035) Fixed the issue of a Flag label unintentionally showing when completing assets. (#26071) Users should now be able to request items that are at zero quantity from the ...Version 16.2.1 (04.30.26)
Web Application Update - May 2026 Web Version 16.2.1 Release items related to a support ticket submissions will be included in parenthesis at the end of a line item. NEXGEN queries should now plot on the map as expected. (#27028) The Show In Store ...