Create/Edit Departments and Divisions - Advanced Configurations
Users making adjustments to their NEXGEN site can update their configurations and make changes to their Department/Division structure. To add new Department/Divisions to your NEXGEN site, users must have at least the following Lookup Table permissions: Modify, Add, View
NEXGEN Standard Department/Division Hierarchy
While NEXGEN clients vary in their organizational structure, NEXGEN standard fields follow the hierarchy below:
Departments in NEXGEN serve as the highest level while divisions sit under different Departments. While some users may find it helpful to try and align their organizational structure with NEXGEN's separation of Departments and Divisions, other users may find it more beneficial to create additional Departments and Divisions in NEXGEN that are not currently considered as separate groups within their organization. For example, if your organization has one group (Stormwater) that handles a variety of work requests, system administrators may consider creating additional Divisions for that specific Department to separate the type of work they manage.
Add a New Department/Division
To add a new Department or Division to your site, follow the steps below.
- Navigate to the Lookups module.
- From your dashboard click Settings > Setup > Lookups.
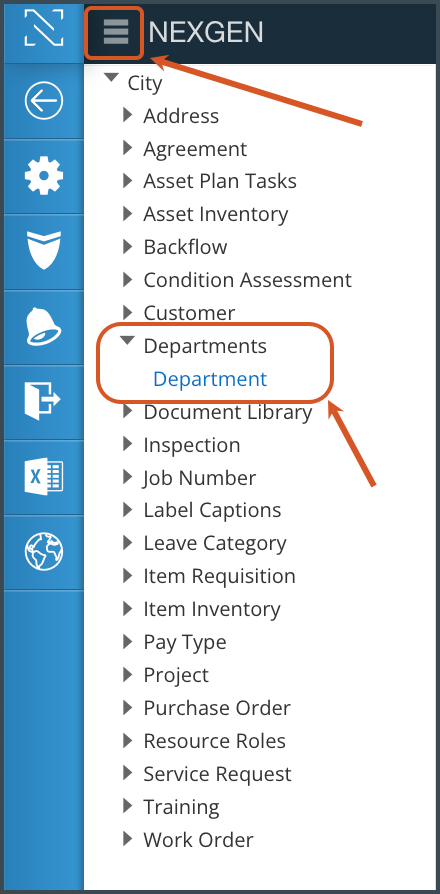
- Using the left sidebar, expand the "Departments" section by clicking on the small arrow next to the text.
- If your left sidebar is not visible click the 3 lines on the top left corner of your screen.
- Click on "Department" to view all the existing departments and Divisions for your site.
- To add a new department or division, click on the "+Add" button on the top right of the screen.
- In the line item that appears, enter a department name. If this new entry will be a division, also populate the "Parent Department" field with the name of the Department the Division will sit under. In the example shown below, the "Hazardous Waste" Division will be listed under the "Garbage & Recycling" Parent Department.
- Make sure to check the "Active" box to have your new Department/Division visible across your site.
- Click the blue checkmark to save your options.
 Edit an Existing Department/Division
To edit an existing Department/Division, follow the steps below.
- Navigate to the Lookups module.
- From your dashboard click Settings > Setup > Lookups.
- Using the left sidebar, expand the "Departments" section by clicking on the small arrow next to the text.
- If your left sidebar is not visible click the 3 lines on the top left corner of your screen.
- Click on "Department" to view all the existing departments and Divisions for your site.
- Locate the Department/Division you would like to make changes to and click the dropdown arrow for that row.
- To edit the Department/Division click the pencil edit button. To delete the Department/Division click the trashcan delete icon. Please note that users will only be allowed to delete a Department/Division if it is not associated with any existing records. Users can mark a Department/Division inactive instead if the Department/Division no longer exists but users want to maintain the historical data.
- Once you are done making your edits, click the blue checkmark to save your changes.

If you ever need to change the name of a Department/Division, doing so is easy! Just follow the "Edit an Existing Department/Division" workflow above and change the name. You do not need to create an entirely new Department/Division. All existing records with the old Department/Division name will be automatically updated with the name change.
Related Articles
Lookups Overview - Configurations & Advanced Features
NEXGEN users are able to modify dropdown menus (lookups) for organization-specific needs and uses. To learn more about the Lookups module and how to adjust any dropdown options, please review the information below. Users that are unable to view the ...NexgenAM Service Request Add-In on Outlook
Our NexgenAM Service Request Add-In is an extension on the Outlook Desktop App. The Add-In allows you to create NEXGEN service requests directly from your email account. Video Overviews Windows Users Mac Users Setting up Your Add-In Get Add-In from ...Create/Edit/Link a User Account - Configurations
When a new user needs to be added to a NEXGEN site, they must be added as both a user and an employee. The user record for a new employee holds their login information and user privilege settings while the employee account stores employee ...Edit and Add Asset Classes - Asset Inventory
Assets are organized by class in the class hierarchy tree. The top 6 classes (Area, Equipment, Linear, Misc, Structure, and Vehicle) are common across all client sites. Sub-classes are customizable per client. Learn how to add, edit, or delete ...Add a New SR Type - Lookups
Service request types can be configured in Lookups so that the Type drop-down field can be populated in NEXGEN. This is useful for categorizing your service requests and making sure you know what the service request might entail at a glance. Adding ...